
 |
| Image Source: Mad Mim |
Showing posts with label tutorial. Show all posts
Showing posts with label tutorial. Show all posts
Wednesday, September 28, 2011
Make Your Own T-Shirt Pattern
Found a great tutorial I just had to share - Mad Mim's 'Basic Fitted T-Shirt Pattern'. Make your own pattern with these great pattern drafting instructions.


Sunday, September 18, 2011
Kids' Messenger Bag
Found this great tutorial over at Zaaberry. Can't wait to make some of these CUTE messenger bags for some of the little people in my life.

It didn't take me long to find some matching fabrics to use and prewash/shrink! As they're kids' bags, I anticipate they may need the occasional wash, so best to preshrink now, so the fabrics keep their shape once sewn.
Here, take another look at this cuteness:
Get the tute at Zaaberry!

It didn't take me long to find some matching fabrics to use and prewash/shrink! As they're kids' bags, I anticipate they may need the occasional wash, so best to preshrink now, so the fabrics keep their shape once sewn.
Here, take another look at this cuteness:
 |
| Image: Zaaberry |
Monday, September 12, 2011
Nautically Embellished Polos - A mini tutorial
At the moment, everything nautical seems to be en vogue. Stripes, rope and anchors are popping up everywhere. People really seem to be enjoying the trend - for example, for kids; The Girl Creative's Sailor Pants tute (as well as a guest Sailor Skirt post), Sew and The City's simple sailboat softie tute, Kalleen's Sail Away School Dress; and for adults, the Asymmetrical Maxi Dress by Sew Petite Girl, DIY Nautical Headband, Nautical Belt tute, Nautical Dress Tutorial and there's even nautical nail art video tutorials on YouTube!
I saw some $6 kids' striped polo shirts at K-Mart, and decided that I could turn them into something a little more special - and nautical, of course, to fit in with the upcoming Southern Hemisphere summer. They were OK on their own, but pretty basic.

They were already striped, so that's a good start for the nautical look.
The thing about embellishing a shirt like this is that you can choose how far to take the embellishment. One of the easiest things you can do is simply change the buttons. I took the polo with me to the craft/fabric store and matched the size of the buttons to some shiny anchor buttons. It is important to get the same size buttons as already on the shirt (or as similar as possible). Otherwise, they most likely will not fit through the buttonholes.
Snip or unpick the threads holding the buttons on, and remove. Set them aside if you like, for a future project!
Now sew on your new shiny buttons, in the same place as the old ones. Double your thread or use embroidery floss (like for cross stitch) for extra hold. Slip the new buttons through the buttonholes and check it out!

Below you can see a side by side comparison of an unchanged polo and one that has simply had the buttons changed. You could stop here if that's fancy enough for you.

I wanted a design on the shirt as well, and settled on an oversized anchor. A quick google image search for 'anchor template' turned up this delightful number from Craft Ideas, which you can download here.
You can also use a store bought iron on patch if you prefer to skip this step. If so, iron on the patch and you're finished!
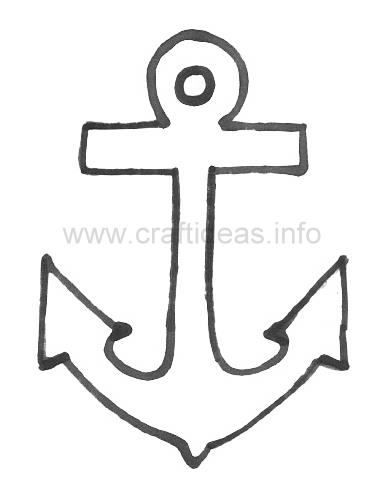 Print out your template and cut it out.
Iron a fabric square a little bigger than the size of the cut out template to some double sided iron on interfacing. You may know this as Wonder Under, Vliesofix or Heat & Bond. Any of these is fine, just make sure it's the double sided stuff, to make this easierand quicker for you. You can use single sided iron on interfacing, but that will make your job a little harder.
At this step, I traced around the template onto my interfaced fabric, with my fabric pen that disappears when you wet it, and then cut out the shape. It's easier to cut after being interfaced, the cut will be straighter as the fabric is sturdier.

The pen is definitely a worthwhile investment! If you don't have one, any pen or chalk will do, or if you are worried about marking your design, just pin the template to the fabric and cut.
Now iron on your cut out anchor shape to your polo shirt, following manufacturer's instructions. If it didn't come with instructions, google 'double sided fusible interfacing tutorial'. There's heaps of them out there.
If you used single sided iron on interfacing, you'll now need to pin the shape to your shirt and sew around it at this point.
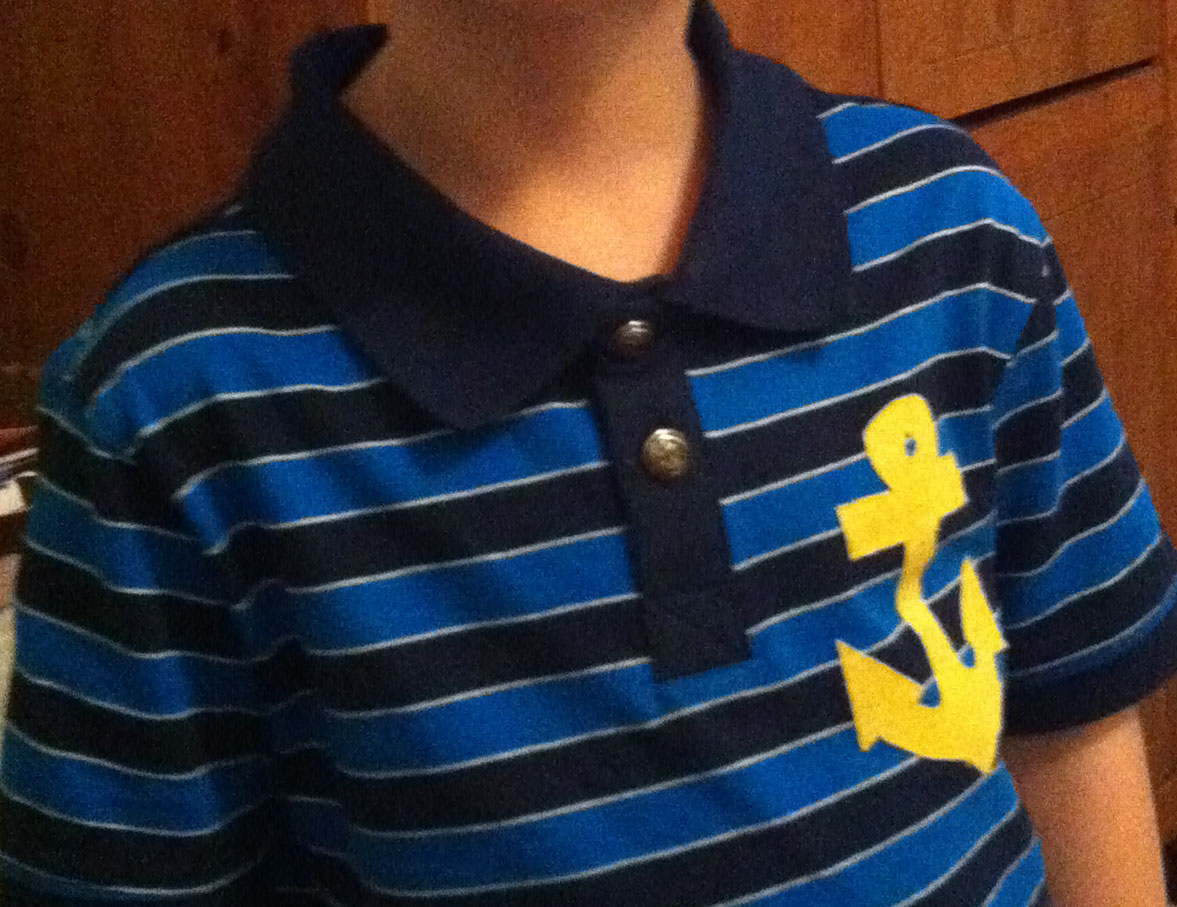
Your shirt should look a little like this. Note one polo has new buttons, one without, to show you what the polo would look like if you choose not to change the buttons.

If you don't like to sew, you can finish here, although sewing around the shape will make it last much longer through laundering and tumbledrying.
For the sewers, simply topstitch around the shape, don't worry too much about keeping a perfect shape. If the thread is the same colour, no one will even notice that corner is not perfect!
If you want to have a contrast here, you could use a different colour topstitching thread, or even a thicker thread. You could also handstitch around it with embroidery thread if that takes your fancy.
In any case, you're finished! Trim your threads and get someone to try on their new shirt.

Apologies for the iPhone pics! I really need to get batteries for my real camera soon!
 |
| Image: DIY Nautical Headband by Presser Foot |
I saw some $6 kids' striped polo shirts at K-Mart, and decided that I could turn them into something a little more special - and nautical, of course, to fit in with the upcoming Southern Hemisphere summer. They were OK on their own, but pretty basic.

They were already striped, so that's a good start for the nautical look.
The thing about embellishing a shirt like this is that you can choose how far to take the embellishment. One of the easiest things you can do is simply change the buttons. I took the polo with me to the craft/fabric store and matched the size of the buttons to some shiny anchor buttons. It is important to get the same size buttons as already on the shirt (or as similar as possible). Otherwise, they most likely will not fit through the buttonholes.
Snip or unpick the threads holding the buttons on, and remove. Set them aside if you like, for a future project!
Now sew on your new shiny buttons, in the same place as the old ones. Double your thread or use embroidery floss (like for cross stitch) for extra hold. Slip the new buttons through the buttonholes and check it out!

Below you can see a side by side comparison of an unchanged polo and one that has simply had the buttons changed. You could stop here if that's fancy enough for you.

I wanted a design on the shirt as well, and settled on an oversized anchor. A quick google image search for 'anchor template' turned up this delightful number from Craft Ideas, which you can download here.
You can also use a store bought iron on patch if you prefer to skip this step. If so, iron on the patch and you're finished!
Iron a fabric square a little bigger than the size of the cut out template to some double sided iron on interfacing. You may know this as Wonder Under, Vliesofix or Heat & Bond. Any of these is fine, just make sure it's the double sided stuff, to make this easierand quicker for you. You can use single sided iron on interfacing, but that will make your job a little harder.
At this step, I traced around the template onto my interfaced fabric, with my fabric pen that disappears when you wet it, and then cut out the shape. It's easier to cut after being interfaced, the cut will be straighter as the fabric is sturdier.

The pen is definitely a worthwhile investment! If you don't have one, any pen or chalk will do, or if you are worried about marking your design, just pin the template to the fabric and cut.
Now iron on your cut out anchor shape to your polo shirt, following manufacturer's instructions. If it didn't come with instructions, google 'double sided fusible interfacing tutorial'. There's heaps of them out there.
If you used single sided iron on interfacing, you'll now need to pin the shape to your shirt and sew around it at this point.
Your shirt should look a little like this. Note one polo has new buttons, one without, to show you what the polo would look like if you choose not to change the buttons.

If you don't like to sew, you can finish here, although sewing around the shape will make it last much longer through laundering and tumbledrying.
For the sewers, simply topstitch around the shape, don't worry too much about keeping a perfect shape. If the thread is the same colour, no one will even notice that corner is not perfect!
If you want to have a contrast here, you could use a different colour topstitching thread, or even a thicker thread. You could also handstitch around it with embroidery thread if that takes your fancy.
In any case, you're finished! Trim your threads and get someone to try on their new shirt.
Apologies for the iPhone pics! I really need to get batteries for my real camera soon!
Adding Pockets to Pants
If the idea of sewn in pockets (as opposed to patch pockets) scare you, this tutorial by Shwin & Shwin makes them seem a little easier.

I know I will be combining this tutorial with the tried and true Kid Pants pattern for my next pants project! I'll make sure to let you know how they turn out.

I know I will be combining this tutorial with the tried and true Kid Pants pattern for my next pants project! I'll make sure to let you know how they turn out.
Sunday, August 21, 2011
New vest
Today I finished this little vest for my niece's birthday present, although this post will be delayed so it stays a surprise until after the party. The fabric was so lovely I couldn't resist, even though it was more than I'd usually pay for fabric for a child's garment. She's only little, so it didn't take much, and she's worth it!

It has a really lovely, bumpy texture, and hangs nicely. I combined it with pink denim to ensure it had a decent weight and hopefully washes well. Let's face it, toddler clothes are going to need washing!
I pre-washed and tumbledried my fabrics, as usual. I do this with all my apparel fabrics before sewing, or actually with anything I think might need washing in the future. This way, it's less likely to shrink by a large amount when washed after wear, and the seams stay nice. It drives me crazy waiting for the fabric to be ready for sewing, but it's worth it for the end result.
I know I hate it when I buy something at the shops, and then it shrinks weirdly in the wash and never sits the same way again.

I used a button on this one, without a snap, due to my new buttonholing skill! I love how it turned out. Originally, I had intended to use the patterned fabric on the inside of the vest, but it looked so cute, I couldn't bear to hide it ;)

I've made 2 of these previously, and I really recommend this pattern.
Happy Birthday, munchkin. Love you.

It has a really lovely, bumpy texture, and hangs nicely. I combined it with pink denim to ensure it had a decent weight and hopefully washes well. Let's face it, toddler clothes are going to need washing!
I pre-washed and tumbledried my fabrics, as usual. I do this with all my apparel fabrics before sewing, or actually with anything I think might need washing in the future. This way, it's less likely to shrink by a large amount when washed after wear, and the seams stay nice. It drives me crazy waiting for the fabric to be ready for sewing, but it's worth it for the end result.
I know I hate it when I buy something at the shops, and then it shrinks weirdly in the wash and never sits the same way again.

I used a button on this one, without a snap, due to my new buttonholing skill! I love how it turned out. Originally, I had intended to use the patterned fabric on the inside of the vest, but it looked so cute, I couldn't bear to hide it ;)

I've made 2 of these previously, and I really recommend this pattern.
Happy Birthday, munchkin. Love you.
Monday, June 6, 2011
Great Appliqué Tutorial
I love appliqué-ing different shapes and designs onto clothing, bags and zippered pouches...sometimes it just adds a little something. Here are some of mine:

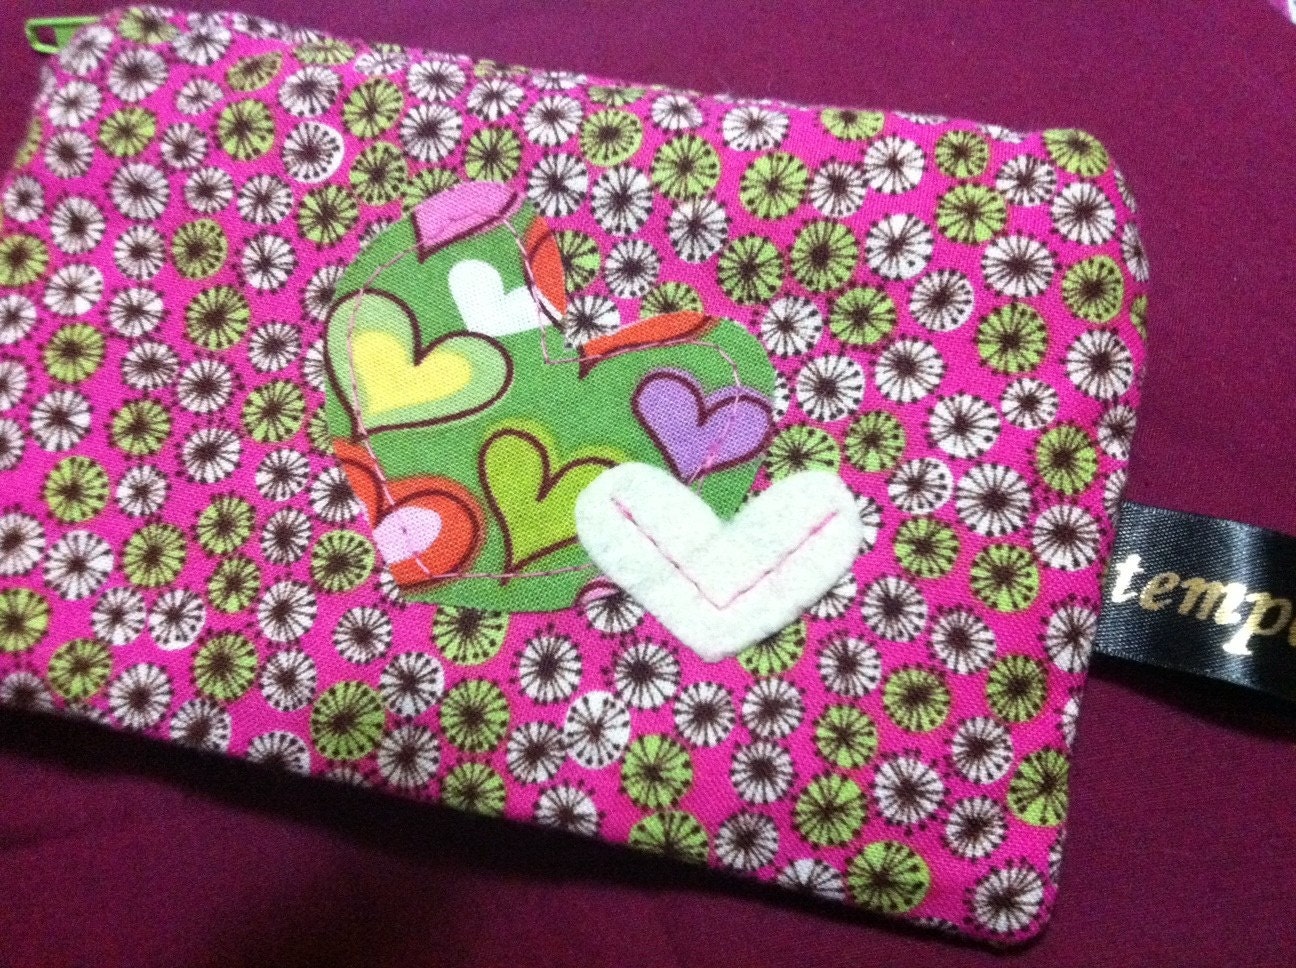

If you are new to appliqué, you may want to check out the following tutorial (via What The Craft) as it takes you step by step and is really well explained.
There's heaps of different ways to appliqué...I personally love using Wonder Under (sometimes called Vliesofix in Australia), which is double sided iron on interfacing. In other words, you iron the shape on to the interfacing, and then you can iron it on to your project before top stitching around it. I find it adds stability and it's easier to place your appliqué.


There's heaps of different ways to appliqué...I personally love using Wonder Under (sometimes called Vliesofix in Australia), which is double sided iron on interfacing. In other words, you iron the shape on to the interfacing, and then you can iron it on to your project before top stitching around it. I find it adds stability and it's easier to place your appliqué.
Thursday, June 2, 2011
Hula Hoop Rug
Gosh, I love this hula hoop rug tutorial, by Nicole Blasenak Shapiro, as seen on Family Fun! What a fun thing do do with some old t-shirts or fabric scraps.

Sunday, May 22, 2011
Appliquéd T-Shirts
Had some fun making tie appliqués for some kids' shirts over the weekend, what do you think?
If you want to give it a try yourself, head over to Crap I've Made's Appliqued Onesie tute. It really is quite simple and I've already had random compliments from strangers! They look great. Thanks, Char!
If you want to give it a try yourself, head over to Crap I've Made's Appliqued Onesie tute. It really is quite simple and I've already had random compliments from strangers! They look great. Thanks, Char!
Sunday, March 20, 2011
Funky Belts
Check out this awesome belt tutorial from Elsie Marley. I made two of these tonight for kids aged 2 and 4 and they just adore them.


Always great to see things you make being appreciated by little ones, they are so honest and expressive you know they mean it when they tell you they love something!
I did make a variation which I believe makes them even better. I love her version - great, especially if you have an awesome fabric that you want to use. This time, I wanted to speed up the process though, and make them a little 'rockstar' as the 4 year old just loves his 'rockstar style'.
The simple change I made was using cotton webbing instead of sewing fabric and interfacing etc. I really love the end result! Better non phone pictures coming soon. Meanwhile, if you need a belt to keep your little guy or gal's pants up, give this tute a try!


Always great to see things you make being appreciated by little ones, they are so honest and expressive you know they mean it when they tell you they love something!
I did make a variation which I believe makes them even better. I love her version - great, especially if you have an awesome fabric that you want to use. This time, I wanted to speed up the process though, and make them a little 'rockstar' as the 4 year old just loves his 'rockstar style'.
The simple change I made was using cotton webbing instead of sewing fabric and interfacing etc. I really love the end result! Better non phone pictures coming soon. Meanwhile, if you need a belt to keep your little guy or gal's pants up, give this tute a try!
Wednesday, September 22, 2010
Another cushion: Argyle
Loving this argyle cushion I spotted courtesy of Craftzine originally blogged at Bugs and Fishes.

Once again, you can make it yourself! This one is made out of felted jumpers/sweaters, but you can use any felt. Get Laura's how to at Bugs and Fishes.

Once again, you can make it yourself! This one is made out of felted jumpers/sweaters, but you can use any felt. Get Laura's how to at Bugs and Fishes.
Monday, September 20, 2010
Gosh, I love Dana from Made's gorgeous faux chevron cushion! What a great idea. Head over to the tutorial and you can make your own, too. At the moment, Dana is Celebrating Yellow, so make sure to check it out!
 |
| Image Source: Dana at Made |
Tuesday, August 17, 2010
Printing on fabric using a home printer
 |
| Image Source: My Repurposed Life |
The best idea I have seen yet for printing onto fabric with your home printer! Gail at My Repurposed Life uses full page labels with the fabric. Check out her tutorial on how you can do it too here or via her button below.

Sunday, May 30, 2010
Owl Softie
I have been on the look out for something to make for a friend's baby shower. She's having a baby boy :D
Well, I was running out of time, so I was really glad to see The Rubber Punkin's Owl Softie Ribbon Tutorial again. I had seen it ages ago and 'meant' to make it but had not gotten around to it. Ah. Like so many projects.
Here's Emily's version:

Source: The Rubber Punkin
Cute, huh? I thought I would give the tutorial a try.

I decided to topstitch around him in a constrasting thread to secure the opening and basically to reinforce it against little teeth just a little more.

He's really quite lovely.
Here's a picture for some size perspective.

Very easy to follow pattern and tutorial. Thanks, Emily.
I made up one of Noodlehead's Diaper Pouches to go with my little owl. I found it to be a very good tute.

Here it is (above) before a final iron...
It was quite fun to make, and they seemed to like it :D. I put a newborn nappy inside with a packet of wipes, and paired it with the owl and a bottle of baby shampoo.
It all went in a homemade (thanks to the overlocker/serger) orange organza bag, tied with organza orange and yellow ribbons.
Next time I will try a fabric flap, this time I used some cotton twill tape.
Saturday, May 29, 2010
Great Tutorial for inserting press studs/metallic snaps
I needed to insert some press studs today for the first time and just thought I would look for some instructions first. These are the neat and tidy looking ones you bang in with a hammer, not the sew in type.
I found a great (and amusing) tutorial on CraftStylish by PepperberryAndCo. Very easy to understand, unlike the odd diections on the pack.

I only made 3 changes/diversions from the tute. I interfaced (fusible) behind the stud site; hammered on my desk over a towel (naughty) and used a mini dumbell to bash it instead of a hammer. What? It was handy!
I found a great (and amusing) tutorial on CraftStylish by PepperberryAndCo. Very easy to understand, unlike the odd diections on the pack.
I only made 3 changes/diversions from the tute. I interfaced (fusible) behind the stud site; hammered on my desk over a towel (naughty) and used a mini dumbell to bash it instead of a hammer. What? It was handy!
Tuesday, May 25, 2010
Toddler hat
Today I tried out this cuuuute tute on U-Create, a guest tute by Abby from Sew Much Ado.
The name - 4-In-1 Bucket Hat.

The verdict - yes.
What a great tute!
I really enjoyed making my first hat...it can be a bit tricky to get the seams right between crown and band, but now I have made one, I think it would be much easier next time. These ones are a bit crooked, but to be honest, when it's worn I could not tell. I've heard hat sewing is a somewhat learnt skill.

I still have at least another 2 to make, one for another hat needing child and one for a baby shower. The child wearing the hat in the pics actually had a head measurement of 1 and a half inches more than the measurement given in the pattern, it still fits fine and also fits a child of the pattern's head measurement. The child pictured wascajoled asked once to look down for the photo, it doesn't actually cover their eyes but gives good sun coverage.
This was a great tutorial. Thanks Abby, and Kari too, of course.
Fabric is a cute Japanese print - D's Selection Tip Top. A beautiful medium weight cotton...a dream to sew with. Had that lovely, buttery designer feel to it. Yum. Thanks Mater, for the great pressie!
The name - 4-In-1 Bucket Hat.

The verdict - yes.
What a great tute!
I really enjoyed making my first hat...it can be a bit tricky to get the seams right between crown and band, but now I have made one, I think it would be much easier next time. These ones are a bit crooked, but to be honest, when it's worn I could not tell. I've heard hat sewing is a somewhat learnt skill.

I still have at least another 2 to make, one for another hat needing child and one for a baby shower. The child wearing the hat in the pics actually had a head measurement of 1 and a half inches more than the measurement given in the pattern, it still fits fine and also fits a child of the pattern's head measurement. The child pictured was
This was a great tutorial. Thanks Abby, and Kari too, of course.
Fabric is a cute Japanese print - D's Selection Tip Top. A beautiful medium weight cotton...a dream to sew with. Had that lovely, buttery designer feel to it. Yum. Thanks Mater, for the great pressie!
Monday, May 17, 2010
Easy Felt Applique Tutorial - No/Low sew!
My local 'discount' department store has some children's clothing on special in season. In winter it is $6-8 for a plain sweatshirt/pair of sweat/track pants; in summer it's around the same for t-shirts and shorts. It's an easy way to add to their wardrobe without costing too much money. However, they are plain and boring.


Blah.
A good way to make their new piece of clothing look much cuter is to add an applique to it. I'm still new at applique, but thought I would share how I recently updated 2 cheap tracksuit tops to look a little more kid friendly and more personalised. These can be great for a gift too.
You do not HAVE to sew to do this. Awesome.
I decided to use felt as my applique. It's strong and hardy, and you do not have to worry about it fraying too much. Bonus. You can also use fabric, but the edges will fray. That can be a cool look, just make sure you top stitch at the end.
Find an applique shape that suits the child you are embellishing the top for. I decided to not get too fussy with mine as I find simple usually looks best.
I chose this dinosaur from freeaplique.com and a some stars that I drew with the shape tools in Microsoft Publisher. You could use any similar program; you could even use the clip art in Word. Remember you will be cutting out the silhouette of the image, so it must be obvious by the silhouette what the object is, unless you are planning on getting fussy and adding heaps of detail.
Some ideas: dinosaurs, mermaids, stars, guitars, crocodiles, initial, robots, flower, hearts, bunnies, cars, tools, etc.

Next, print the applique pattern/shape and pin to felt. Cut to shape. Don't worry about being too exact, as you can trim later.

Take out pins. Trim any yucky edges to taste.
At this step, I like to pin my applique to the tracksuit top to see where is looks best. At first, the plan was to centre the images, but I like the look of them slightly off centre.
If you have the child handy, get them to try on the top so you can see how it will look when it is worn. If they are not around, just keep in mind where the clothes may look when worn. For example, if you want to put an image on one side, make sure it is not TOO far over or it may end up being half hidden from view, or under an armpit :)
If child is cooperating, you can move the felt shapes around to get them where they look good.
It's optional, but at this stage I chose to interface my felt. Felt is much stiffer than other fabrics so you could *possibly* miss this step. I decided I would go with it and try and preserve the appliques' shapes through the many envisioned washes in the future.
If you don't want to do this, sew shape to top. You're done.
Use some Wonder Under, Heat N Bond or similar double sided fusible (directions) and iron it to the felt shape. Trim paper so it doesn't show on the 'right' side (picture below pre trim).

If you're using double sided iron on interfacing, you can now peel the paper off and iron your shape in place on the top.
Optional: Topstitch around shape; it helps it last longer and just adds a nice finish. You can do this neatly or in a crazy, messy modern style. I like it a little crooked - a lot of kids clothes are being sold that way at the moment and I think it's cute.
If you're not using double sided fusible, pin interfaced shape to tracksuit top in place. CAREFULLY, sew around shape. You can use a zig zag, but a plain stitch looks fine.
Stitch around shape even when using double sided interfacing, if you can (warning, terrible picture below).

DONE. Easy as. Now take that kid to the park and show off the handmade goodness.
This is not just for kids, either. I can see some luuuuurverly adult tops being made the same way, perhaps with some layered flowers or scrolls. Hmm.
Cuteness on a stick. Or, on a kid.
Oh and ignore that hanging thread in the last pic. Thanks :) It has now been snipped.

Wednesday, January 27, 2010
Tutorial: La Tempête’s Hessian Heart Garland
Hi there! I have been wanting to make something simple to decorate for Valentine's Day without being too over the top. I've also been seeing a lot of people making all sorts of things out of hessian/burlap; pillows, art etc. I also had some hessian my MIL spotted on sale at our local craft store. TA DA! An idea was born.

I wanted a simple, modern and unfussy look. I hope you like my Hessian Heart Garland! It's REALLY easy to make. I've included a tutorial below just in case anyone would like to make their own.
The picture above is a bit blurry and bluish, what is up with that, camera?!?! In the tute you can see the hearts are a bit pinker and see more detail on the hessian. This project cost me nothing as I used things from my stash. If I were to estimate, it would be under $10.


The picture above is a bit blurry and bluish, what is up with that, camera?!?! In the tute you can see the hearts are a bit pinker and see more detail on the hessian. This project cost me nothing as I used things from my stash. If I were to estimate, it would be under $10.


Monday, January 25, 2010
Oh, the excitement
I was super excited to open my blog reader yesterday to see this:


My first tutorial was shared on Craft Gossip! Wow! Thank you to whomever suggested me :) You guys are awesome! I love Craft Gossip, it's one of my 'must open' items on my reader. So inspirational.
Saturday, January 23, 2010
My first tutorial - La Tempete's Trimmed Tea Towels
UPDATE: Sorry if you tried to download earlier and couldn't. Scribd helpfully changed the privacy setting for me, but this has been rectified now. Apologies!
Here is my first tutorial for my Trimmed Tea Towels that I posted about a while ago. Hope you like it! I'm new to this, so hopefully it is easy to read etc. Please be kind! This is a really easy project that even a beginner sewer can handle.
All you need are towels, scrap fabrics, and trim. Whatever you have on hand is just fine. Anyone that can already sew will find these super duper easy. If you are just learning, it's a good project as it is just straight sewing and does not take long.
Beginner sewers take note: ironing/pressing is not fun (for me). However, it helps the end product look great.
You can view below or download. Let me see if you make some from the tutorial, I'd love to post pictures and links to your blog! More tutorials coming soon.
La Tempete's Trimmed Tea Towels
For personal use only. (c) 2010 Tempest Ahoy
Linked up to:


Blogged at Craft Gossip!!!
Here is my first tutorial for my Trimmed Tea Towels that I posted about a while ago. Hope you like it! I'm new to this, so hopefully it is easy to read etc. Please be kind! This is a really easy project that even a beginner sewer can handle.
All you need are towels, scrap fabrics, and trim. Whatever you have on hand is just fine. Anyone that can already sew will find these super duper easy. If you are just learning, it's a good project as it is just straight sewing and does not take long.
Beginner sewers take note: ironing/pressing is not fun (for me). However, it helps the end product look great.
You can view below or download. Let me see if you make some from the tutorial, I'd love to post pictures and links to your blog! More tutorials coming soon.
La Tempete's Trimmed Tea Towels
For personal use only. (c) 2010 Tempest Ahoy
Linked up to:
Blogged at Craft Gossip!!!
Subscribe to:
Posts (Atom)







 Posts
Posts


